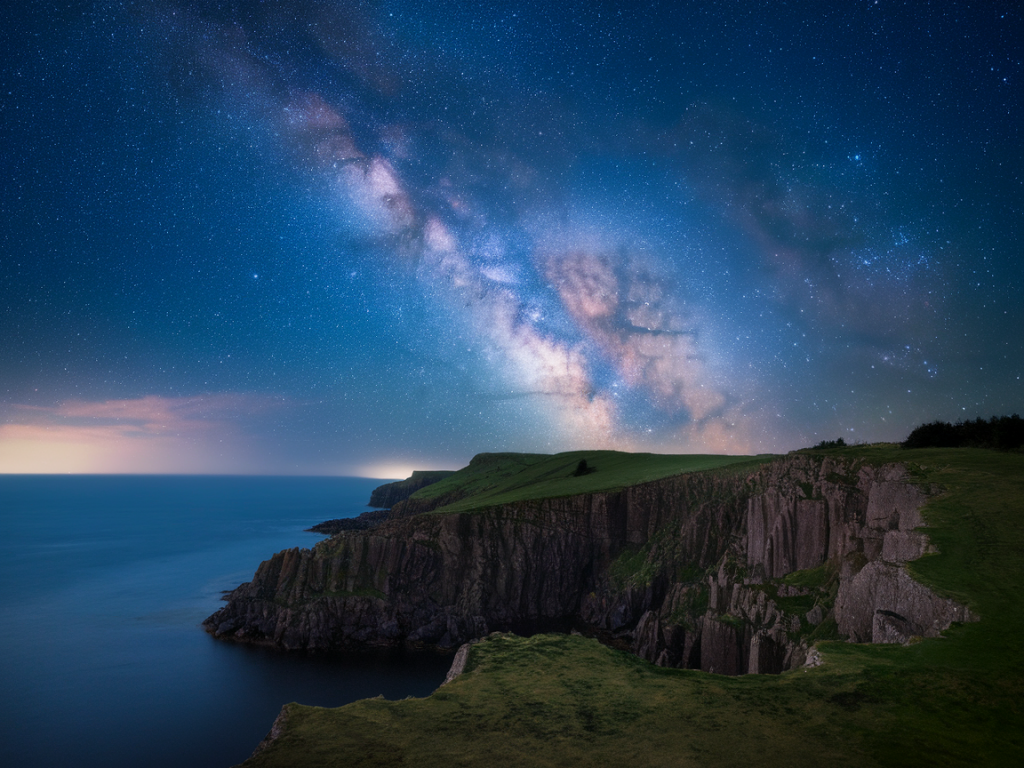
I’ve spent more than one cold, star-splattered night on the cliffs around Durness testing how far a phone camera can go when the Milky Way arcs over the North Atlantic. The good news: you don’t need a full-frame mirrorless camera to capture something memorable. With the right preparation, a steady setup and a few phone-specific tricks you can get stunning Milky Way images from Hillside Durness Co cliffs that look like they belong on a printed postcard.
Why phone astrophotography works here
Durness is one of the best places in the UK for dark-sky photography — low light pollution, wide horizons and dramatic cliff silhouettes. Phone cameras today have large image sensors, excellent computational night modes, and apps that let you control ISO, shutter speed and RAW capture. Combine that with a stable tripod, a remote shutter (or self-timer) and careful composition, and you can produce images with detailed stars, subtle Milky Way colour and foreground texture.
Plan the night: timing, moon and weather
Smart planning will make or break your shoot. I never head out without checking:
- Moon phase: Aim for a new moon or nights when the moon sets early. A bright moon will wash out the Milky Way. PhotoPills or the free app Stellarium shows moonrise/set and Milky Way position for any date.
- Weather: Look for clear, dry skies. Coastal humidity can create haze — I prefer nights after a cold front when the air is crisp.
- Light pollution: Even in Durness I avoid nearby villages. Check Dark Site Finder maps and pick a spot with a clear southern horizon for the Galactic core (summer months).
- Timing: In summer the Milky Way core sits low on the horizon late at night; in spring/autumn it’s higher earlier. Arrive early to set up in twilight and scout foreground elements.
What to bring (phone-specific kit)
- Phone with manual/night mode and RAW capture (iPhone 11 or later, Google Pixel 4/5/6, Samsung S20+ and newer work well).
- Small tripod — I use a Joby GorillaPod for uneven rocks, or a compact Peak Design Travel Tripod for extra stability.
- Remote shutter or use the 3–10s self-timer to avoid shake.
- External wide-angle lens (Moment 18mm or a clip-on wide) if you want a broader field of view.
- Warm clothing, headtorch with red light, spare battery or power bank (cold drains phones fast).
- Apps: PhotoPills or Stellarium (planning), a camera app like ProCam / Halide / Open Camera for manual controls, and Lightroom Mobile for RAW edits.
Camera settings that actually work
Phone camera interfaces differ, but the goal is the same: capture as much light as possible without creating too much noise or trailing stars.
| Setting | Recommended | Notes |
| Mode | Manual/Long Exposure or Night Mode with RAW | If your night mode doesn’t offer manual shutter/ISO, use an app like ProCam or Halide. |
| Shutter speed | 6–20 seconds (phones) | Phones have small sensors; very long exposures increase noise. 8–12s is a good starting point. Use longer if the app stacks frames. |
| ISO | 800–3200 | Higher ISO brightens stars but adds noise. Find a balance and prefer RAW so you can recover detail in post. |
| Aperture | Phone fixed (wide lens if available) | Use an external wide lens to get a larger field and less distortion at the edges. |
| Focus | Manual to infinity or tap-focus on a bright star | Autofocus struggles in the dark. Lock focus once stars are sharp. |
Composition and horizons on the cliffs
On the Hillside Durness Co cliffs I think like a landscape photographer: the sky needs an anchor. Look for these foreground elements:
- Silhouetted cliff edges and sea stacks — they add scale to the Milky Way.
- Salt-streaked rocks or tidal pools that can reflect starlight.
- Croft fences, ruins or a lone gorse bush for a local touch.
Place the Milky Way so it balances with the foreground. A low horizon lets the Milky Way dominate; a higher horizon can show foreground detail if you light-paint subtly (more on that below). I prefer a wide field with the Galactic core slightly off-centre to give the image dynamic tension.
Practical shooting tips
- Stabilise the phone: Clamp it tight. Even micro-shifts ruin long exposures.
- Use RAW: Night shots benefit massively from RAW — more latitude for noise reduction and colour recovery.
- Take multiple frames: Phones often use multi-frame stacking. I shoot a sequence of 8–12s frames and let the app stack them for better signal-to-noise.
- Avoid digital zoom: Move closer or use an external lens instead of zooming in — zoom increases noise and reduces quality.
- Light-painting: A short, gentle sweep of a dim headtorch with a red filter can reveal foreground rock texture without blowing the scene. Practice before the Milky Way is at its best to avoid over-illumination.
Post-processing workflow
I edit in Lightroom Mobile and sometimes finish in Snapseed for local tweaks. Basic steps I follow:
- Import the RAW file(s).
- Increase exposure modestly, then recover highlights and deepen blacks to restore contrast.
- Adjust white balance — Milky Way shots often benefit from slightly cooler tones (3800–4200K) for natural night colour, or warmer for dramatic foreground warmth.
- Apply noise reduction carefully — preserve star detail while smoothing the sky.
- Increase clarity and texture selectively on the foreground, not the sky, to avoid accentuating noise.
- Saturation/vibrance — nudges often suffice; don’t push colours into unreal territory unless that’s your style.
When a phone can’t do it alone
There are limits. If you want pinpoint stars with zero noise, deep star fields or very large prints, a dedicated camera will outperform a phone. But for web sharing, Instagram, or framed prints up to A3, the phone approach is more than adequate. If you’re serious about improvement, consider a hybrid approach: use your phone for quick captures and a mirrorless body for longer, cleaner exposures when conditions and time allow.
Safety and local considerations
Cliff edges and tides are unforgiving. I always:
- Scout my composition in daylight so I know safe routes.
- Wear grippy footwear and don’t step too close to eroding edges.
- Tell someone where I’m going and when I’ll be back — there’s no phone signal in some spots around Durness.
- Respect the land: avoid trampling fragile vegetation and follow Leave No Trace principles so these cliffs stay wild for other night-sky lovers.
If you want, I can suggest specific cliff locations around Durness tailored to the month you plan to visit — I keep a few favourite vantage points for the Milky Way depending on the season and tide. When the conditions align, there’s nothing like watching the galaxy rise above the Atlantic; with a little practice, your phone can bring that view home.