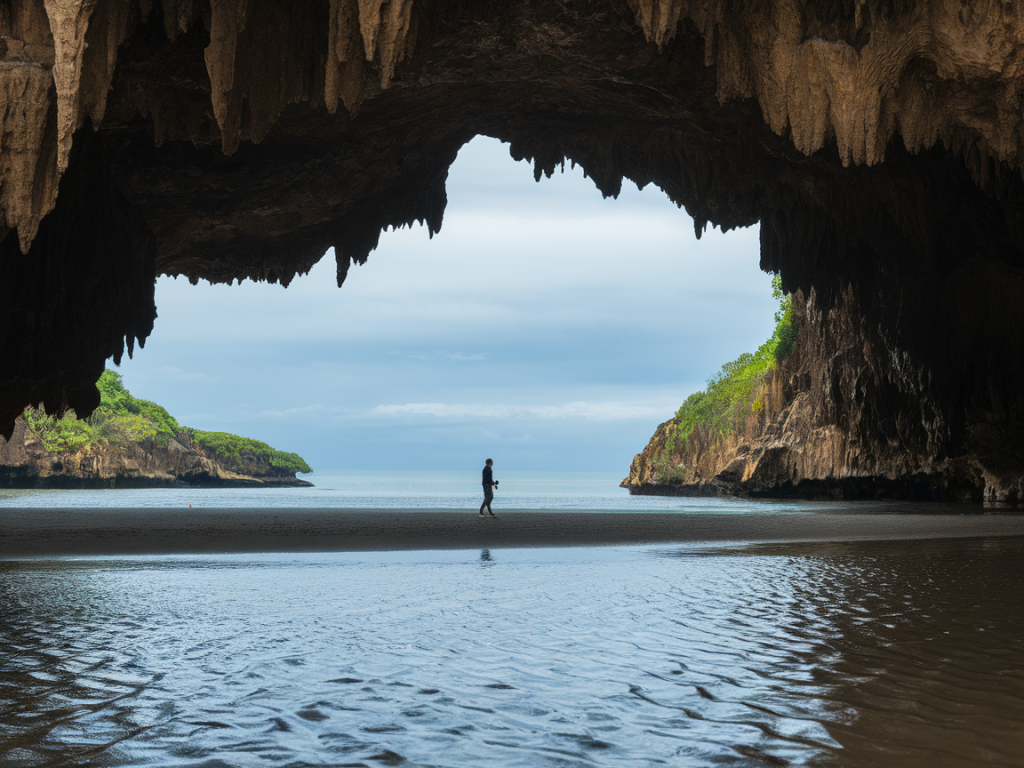
I love Sango Sands for the drama of its caves and the way the sea carves the coastline into something almost otherworldly. But those caves are only safely reachable on the right tide. Over the years I’ve learned to choose a low-tide window that gives me time on the sand without rushing—and to identify a fallback route should the tide or weather turn against me. Here’s my practical, on-the-ground method for picking the perfect window and keeping your walk safe and enjoyable.
Why the right low-tide window matters
The sea here moves fast. A low tide that looks generous on paper can still leave you scrambling if you underestimate walking time, stop for photos, or get delayed by soft sand or large waves. I treat tidal planning like route planning: margin for delays, room to turn back, and clear alternatives. Picking a good window means I can explore cave mouths, look for seals and nesting birds, and set up a tripod without worrying about a hurried exit.
Essential tools I always check
- Tide tables — I use reliable sources like UK Hydrographic Office or commercial sites such as TideTimes and Magicseaweed for the day's low and high tides.
- Weather and wind forecasts — Met Office and Windy give me wind direction and gusts; a strong onshore wind can push waves higher than expected.
- Mapping — Ordnance Survey maps and Navionics chart overlays help me judge distances along the beach and where cliffs restrict exit points.
- Local knowledge — I always check recent trip reports on local forums or the Hillside Durness Co Facebook group; crofters and rangers often share recent changes to the shore profile.
- Mobile safety apps — I keep a weather app, a tide alarm app (set for low tide and safe margin times), and my emergency contacts handy. Signal can be patchy so I set alarms before heading out.
How I choose the low-tide window
My rule of thumb is simple: be on the beach at least one hour before low tide and plan to leave no later than one hour after low tide. That gives me a two-hour window around low tide to explore the caves safely. I widen that to 90 minutes on either side when I plan to linger with photography gear or a group with slower walkers.
Step-by-step:
- Find the predicted low tide time for Sango Sands (not the nearest port unless it’s specified for Durness). Tide charts often list multiple stations—use the one closest to Durness or add the tidal offset.
- Check sunrise/sunset and wind direction for the same day. Golden hour at low tide is a photographer’s dream but be aware that tides line up with daylight only on certain days.
- Estimate walking time to the cave mouths from your parking spot. On soft sand or when carrying a tripod, add 25–40% extra time.
- Set your arrival target for 60–90 minutes before low tide and plan to be off the beach no later than 60–90 minutes after low tide.
What I look for on the day
When I arrive I do a quick reconnaissance from a safe vantage point—usually from the dune ridge or parking area. I look for:
- Actual waterline and swell size: is the sea higher or spindriftier than forecast?
- Any fresh seaweed lines or debris marking recent high water.
- Closed or narrowed beach sections where cliffs and boulders might trap you at rising tide.
- Access points and alternative exit routes marked on the map.
Safe margins and timings (quick reference table)
| Planned activity | Recommended arrival | Latest safe exit | Notes |
|---|---|---|---|
| Quick visit (no stops) | 45–60 mins before low tide | 45–60 mins after low tide | Only for experienced walkers on firm sand |
| Photography / exploring caves | 60–90 mins before low tide | 60–90 mins after low tide | Allow time for setup & tricky route-finding |
| Families / slower groups | 90–120 mins before low tide | 90–120 mins after low tide | Use an extended buffer for safety |
Recognising when to use a fallback route
There are three common reasons I abort the beach route and take the fallback:
- Rising tide narrowing the beach so cliffs block the path.
- Sudden change in wind or swell height that risks wetting the caves’ entrances.
- Any member of the party feeling unsafe or showing signs of fatigue or cold.
When any of the above happens, I don’t hesitate. The sea will always be there next time, but injuries and risky reversals can have lasting consequences.
The safe fallback route I recommend
For Sango Sands I generally use an inland fallback that follows the clifftop path and estate tracks back toward the parking area. From the southern end of the beach the coastal path climbs onto the dunes and links to a firm track that runs parallel to the shore. It’s a few minutes longer than the beach route but safe at any tide.
Key points about this fallback:
- It avoids sections where the cliff base is undercut, so you never have to squeeze between rock and water.
- The track is visible on the Ordnance Survey map as a dashed path and often worn in by walkers and local vehicles.
- In poor visibility, follow fence lines or stone boundary markers—do not try to navigate the cliff edge.
Gear and kit I never skip
My standard kit for a Sango Sands trip includes:
- Waterproof boots or_Dryshod-style shoes with good grip—soft sand plus wet rock is a tricky combo.
- Lightweight waterproof jacket and spare warm layer—conditions change quickly on the north coast.
- Headtorch—always useful if you're delayed after dusk.
- Phone with offline map and tide screenshots, plus a power bank.
- Small first-aid kit and whistle.
- For photographers: a stable tripod (I favour lighter carbon models), lens cloths, and sand covers for gear.
Photography and timing tips
If you’re there for photos, aim for low tide during golden or blue hour for the best light inside the caves. I time my tripod set-up at least 45 minutes before the tide bottom so I can move to the ideal stance without worrying about incoming waves. Use a polariser to deepen skies and cut glare, but be ready to remove it for long exposures to avoid uneven skies.
Real-world cautionary tale
Once I underestimated the tide on a stormy day and had to retrace my steps across a narrower beach than expected. I lost time helping someone stuck behind a large boulder and had to take the clifftop fallback route in fading light. That day taught me never to push the margin and always to brief my group on the fallback before we set off.
Final practical checklist before you head out
- Check low tide time and set alarms for arrival and latest-exit.
- Confirm weather and wind within the next 3–6 hours.
- Tell someone where you’re going and your planned return time.
- Pack the gear list above and a phone with tide app screenshots.
- Identify the clifftop/track fallback route on your map before you leave the car.
With a good tide window, sensible margins and a clear fallback plan, the walk to Sango Sands caves becomes less about pressure and more about noticing the small things: the pattern of pebbles, the tiny gulls nesting in rock hollows, and the particular way light slips into a cave mouth. Breathe, take your time, and let the coast do the rest.