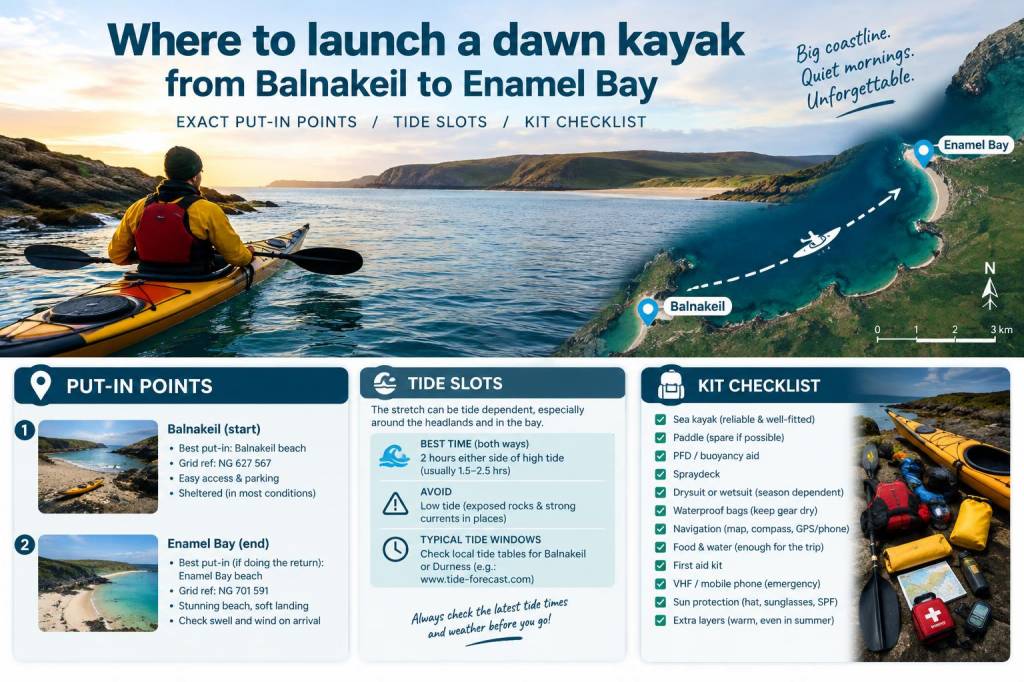
I love launching at first light — the water glassy, the cliffs washed in a peach light and the world quiet except for distant waves. The short paddle from Balnakeil to Enamel Bay is one of my favourite dawn outings from Durness: sheltered stretches, dramatic sea stacks, and that moment when the bay opens up and you realise you have the whole coast to yourself. Below I give the exact put‑in points I use, the tide slots that make the crossing straightforward, and the kit checklist I never leave without. Read this alongside a current tide table and a weather forecast — conditions change quickly in the far north.
Where I put in: exact points at Balnakeil
There are two practical put‑in locations at Balnakeil depending on the sea state and surf:
Both spots are within a few minutes’ walk of the main Balnakeil car park and the public toilets. At dawn there’s usually enough space for cars and trailers, but on sunny weekends it can get busy — arrive early.
Exact take‑off procedure I use
At Put‑In A I check the sand slope for a run of breakers. If there’s any surf I wait for a lull and launch with a partner so we can watch each other’s lines. At Put‑In B I choose the least rocky gap and paddle out at the first slack. I always scan the water for rip lines and submerged rocks, and I keep my paddle perpendicular when crossing any breaker to brace if needed.
Tide slots: when to go (general guidance)
Tides around Durness can be strong and the tidal stream direction shifts along the headlands. The short guidance below is deliberately conservative — check a current tide table and the UK Hydrographic Office Admiralty or Tide Times for exact times for the day you plan to go.
| Trip type | Ideal tide window | Why |
|---|---|---|
| Classic dawn paddle (Balnakeil → Enamel Bay) | Slack to rising tide, roughly from HW‑1 hour to HW+1 hour | Minimises strong opposing currents when leaving Balnakeil and gives a gentle assist into the bay if the tide is rising |
| Return at the same day | Plan return on slack or ebb depending on wind; avoid strong ebb against wind | Strong ebb can make the return hard if there’s an onshore wind |
| Spring tides (large tidal range) | Pick slack near HW or LW; avoid peak streams | Stronger streams and exposed rocks at low water |
Practical tip: I aim to launch about 30–60 minutes before high water if I want to take advantage of a gentle rising tide into Enamel Bay, or at slack if the forecast has a stiff onshore wind. If the forecast shows an easterly gale, cancel — launching into a strong onshore wind with tidal effects is risky.
Route notes and landmarks to watch
From Balnakeil I keep the cliffs on my left and follow the curving coastline. Easy navigation markers:
I stay a comfortable distance from seabird colonies and never land on small stacks or inaccessible wartime features. If you spot seals or otters, keep a quiet line and use a long lens rather than approach closely.
Safety considerations
Even though the crossing can be short, the exposure and tidal streams mean respect and planning are essential. My must‑do safety rules:
My kit checklist (what I bring every dawn trip)
This is what I pack into my hatch or day‑deck. If I’m guiding or on a longer trip I add more food, spare layers and a chart.
Photography and etiquette
Dawn light here can be unbeatable. I bring a small tripod or clamp for the kayak deck to steady my camera, and a long lens (70–200mm) to capture seals and seabirds from distance. Respect wildlife: if a seal swims away, you’re too close; pull back and use zoom.
If you want personalised tidal slots for a specific day, tell me your planned date and I can help interpret the tide times against the forecast wind and swell. Otherwise, print a tide table for Durness, set your alarm, pack the kit above, and savour the stillness — there’s nothing quite like a dawn paddle into Enamel Bay.