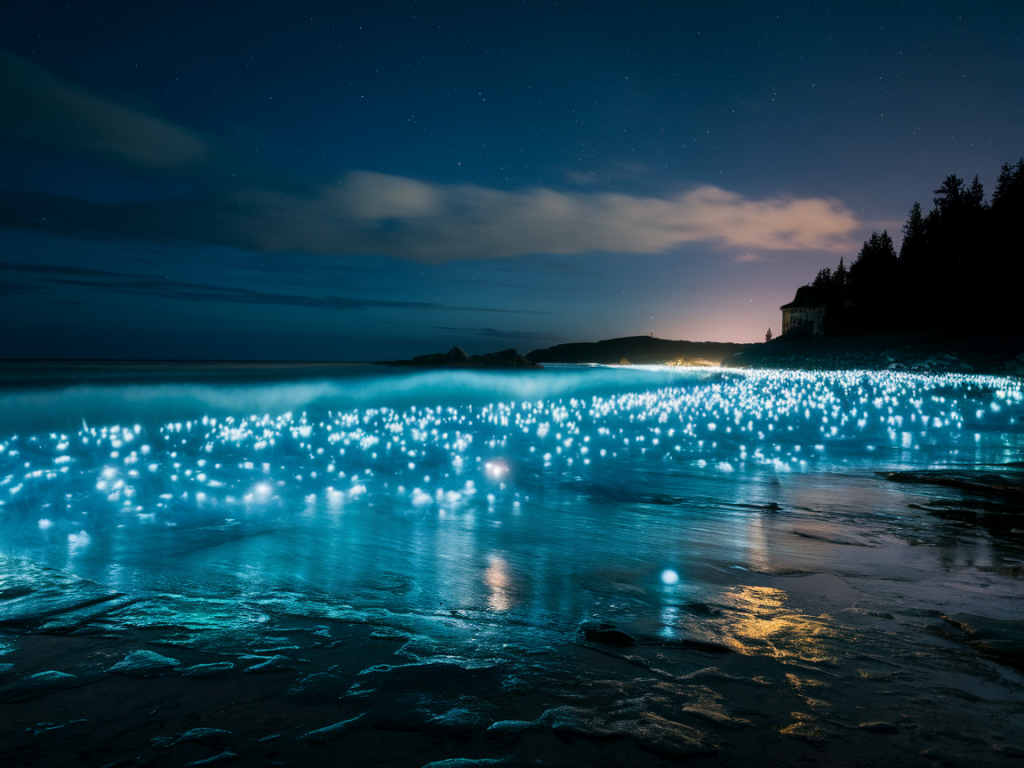
I still remember the first time I saw the shore at Balnakeil light up like someone had spilled stars across the sand. It was one of those quiet, salt-wind nights when the headland felt completely remote, and the bioluminescent tide made every footstep glow for a heartbeat. Photographing this phenomenon with a phone is absolutely possible — it just takes timing, patience, and a few simple tricks. Below I’ll share where I go, how I time the tides and moon, and step-by-step camera settings and composition tips for phone photography so you can capture the blue-green magic without risking the place or yourself.
Where to look near Balnakeil
Balnakeil Bay and the nearby beaches around Durness are my go-to spots. The most reliable stretches are:
- Balnakeil Beach (the wide sandy bay in front of the dunes) — good for long, low-tide exposure along the shoreline.
- Sango Sands and the smaller coves east of the parking area — sheltered pockets can concentrate the glow and make it easy to photograph where waves break gently.
- Balnakeil Bay rock platforms and tidal pools — if plankton get trapped in pools at low tide, the glow can be intense and steady for photos.
I scout from the road and walk slowly along the shore. The advantage of Balnakeil is relatively easy access from the village, but there are also quieter stretches by the dunes and rocks if you want less light and fewer people in the frame.
How to time the bioluminescent events
Bioluminescence isn’t on a set schedule like a sunset. It depends on plankton blooms (commonly dinoflagellates or Noctiluca spp. in these waters), water temperature, nutrients and local disturbance. Still, there are patterns I use:
- Warm, calm nights after low tide: Calm water concentrates plankton and windless nights reduce surface churn, which shows the glow more clearly. I aim for nights with light breeze or none at all.
- Dark moon phases: New moon and the days on either side are best. A bright moon washes out the fluorescence, so I check a lunar calendar before heading out.
- After plankton-rich months: In Durness I’ve seen stronger events late spring through autumn—though you can get flashes outside that window too. Local weather and sea conditions matter more than the calendar month.
- Shortly after high biological activity in the water: After unusually warm spells or heavy plankton blooms reported by local groups, I’ll be alert for glowing tides.
I use a combination of tide tables (check the UK Hydrographic Office or tidal apps), a lunar calendar app, and local Facebook groups or ranger reports. When in doubt, head out on a new-moon, low-wind night near low tide and walk the shore slowly to check for glow.
Responsible behaviour and safety
Bioluminescent bays are fragile. I take care to leave them as I found them:
- Keep off fragile dunes and vegetation — use established paths and access points.
- Minimise light pollution — use a red torch for walking and avoid bright headlamps when shooting.
- Don’t chase or kick large amounts of water into shore for photos — that disturbs wildlife and can damage intertidal organisms.
- Dress for cold, wet conditions and check tide times: rocks and pools can become dangerous at incoming tides.
- Respect local guidance — crofters, rangers or locals may give up-to-date advice on sensitive areas.
Phone camera setup: essentials
Modern phones (iPhone 11/12/13/14/15 series, Pixel 4–7, Samsung Galaxy S20 and later) have excellent low-light performance. To get the best bioluminescence shots:
- Stabilise your phone: Use a tripod or a Joby GorillaPod wrapped around a rock or fence post. Long exposures need absolute steadiness.
- Manual/Pro mode: Switch to Pro or Night mode. If your phone allows manual control, set it to:
| ISO | Start low-ish (around 400–800) then increase only if necessary to avoid noise. |
| Shutter speed | 1–10 seconds for glowing water trails; try longer like 15–30s for faint scenes (but moving waves will blur into streaks). |
| Aperture | Fixed on phones — use the widest available; let shutter and ISO do the work. |
| Focus | Manual focus to infinity or tap to focus on the brightest glow spot to avoid hunting autofocus. |
If your phone lacks a true manual mode, use Night Mode or a third-party app: Halide or Moment Pro Camera on iOS, and Open Camera or Camera FV-5 on Android. NightCap is another good choice on older iPhones.
Compositional tips and creative ideas
Bioluminescence is subtle; the story is the interaction between light and motion. Try these approaches:
- Shoreline sweeps: Long exposures capture the trails of foam and light left by receding waves. Use 2–8 seconds to balance motion and detail.
- Footstep trails: Walk through shallow water or along the wet sand and pause for a 1–2s exposure — your steps will leave ephemeral streaks of light. Be mindful not to damage sensitive zones.
- Tidal pools as lanterns: Frame small rock pools with reflections and use a short exposure to keep the pool’s glow crisp while letting the surrounding rocks stay dark.
- Silhouettes: Place a person or a rock against the glowing water. Low-angle shooting helps emphasise the luminous strip at the horizon.
- Panoramas and time stacks: Capture a series of frames and blend in post (Lightroom or Snapseed) to increase perceived brightness without over-raising ISO.
Post-processing tips for phone shots
A little post-processing goes a long way. I use Lightroom Mobile and Snapseed for on-device edits:
- Reduce highlights slightly and raise shadows to reveal faint glow without introducing noise.
- Increase clarity and texture subtly to make the light pop, but not so much that noise becomes visible.
- Use selective brushes to brighten the glowing areas only, keeping the sky and rocks dark.
- Apply noise reduction sparingly — too much will smear the natural grain and ruin detail.
For more advanced work, export RAW and process on a laptop in Lightroom Classic. RAW preserves more colour and detail from those long, dim exposures.
Gear I carry in my pack
For phone bioluminescence sessions I pack light but smart:
- Small tripod / Joby GorillaPod
- Phone with a wide-angle lens and a small clip-on wide lens (optional)
- Power bank — long night shoots drain phones fast
- Red headtorch (preserve night vision)
- Waterproof jacket and layers; sturdy boots for rocks
- Small towel or microfibre cloth for wiping lenses
I avoid using flash — it destroys the ambience and can disturb both wildlife and fellow watchers.
Bioluminescent nights at Balnakeil feel a little like having the sea whisper its secret. With patience, respect for the place, and a few technical tricks, your phone can capture that whisper and keep a memory of it long after the tide has washed the glow away.