I spent a week testing two lightweight shells on Durness’s cliff tops—walking the Cape Wrath way at dawn, circling Smoo Cave in a stiff sea breeze, and sitting out afternoon clouds on Balnakeil beach—so I could answer a simple question: which lightweight shell jacket actually keeps you warm and comfortable on exposed Scottish cliffs? I focused on two popular choices: a pared-back wind shell from Patagonia and a pared-down waterproof/lightweight shell from Arc’teryx. Below I share field notes on warmth, wind and water protection, packability, fit, and how I layered them for real Durness conditions.
Why a lightweight shell matters here
On the north coast the weather can flip in minutes: bright sun one hour, horizontal drizzle and single-digit wind chill the next. A heavy parka is overkill for a coastal day hike, but a T-shirt won’t cut it either when the wind slices across the cliff edge. A good lightweight shell gives windproofing, a weather barrier for short showers or sea spray, and low bulk for carrying in your daypack. But “lightweight” covers a lot of territory—from featherweight wind shirts that sacrifice waterproofing to minimalist hardshells that still manage to be breathable and durable.
What I tested
My field test compared two very different but commonly recommended shells:
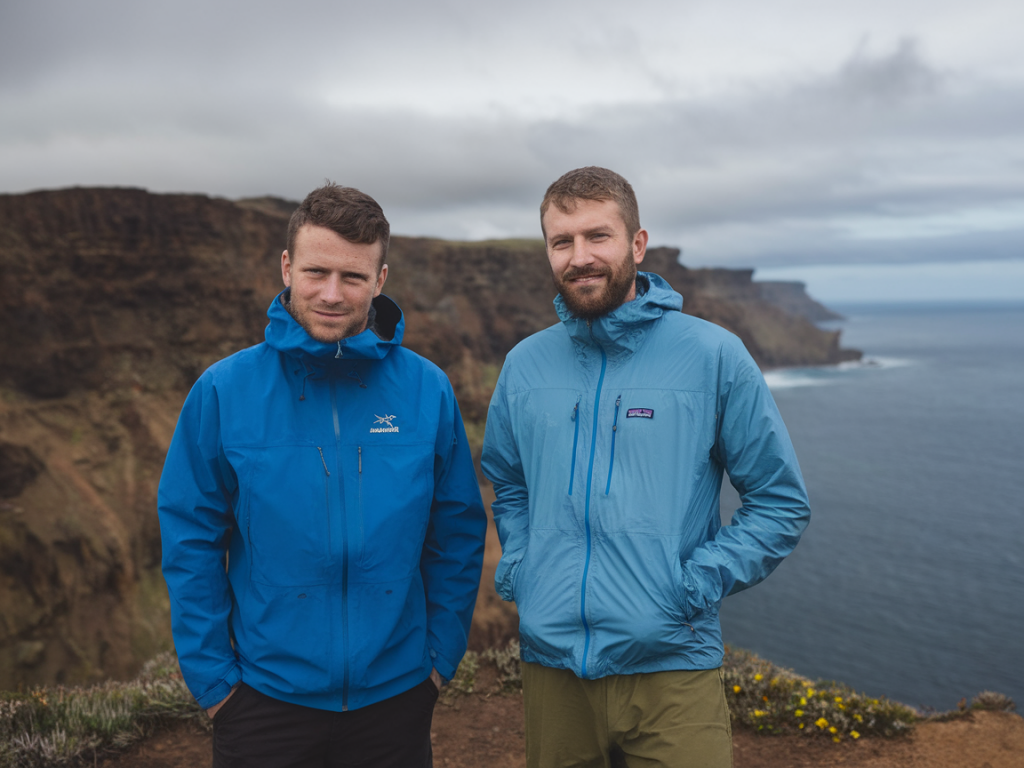
- Patagonia Houdini Hoody (wind shell): ultralight, highly packable, excellent for wind protection and fast-moving hikes; not fully waterproof.
- Arc’teryx Beta LT Jacket (lightweight hardshell): a lightweight GORE-TEX offering robust waterproofing and a closer fit, slightly heavier but more weatherproof.
Conditions during the test
I wore each jacket on multiple outings: a 10km cliff loop with sustained 25–35 km/h winds and spray; a morning of mixed drizzle and strong gusts; and two calm but chilly shoreline shoots where temperature sat around 6–9°C. I paired each shell with the same midlayer (a lightweight fleece) and base layer to keep variables consistent.
Warmth and wind protection
The Houdini’s lightweight ripstop blocks wind surprisingly well—on still, brisk days it felt enough. Its windproof face kept the chill off when moving quickly, and because it’s so breathable I never got clammy when I pushed uphill. But when wind and spray mixed at the clifftops, the Houdini lost ground: the thin fabric transfers cold from damp air and doesn’t trap much heat when you’re standing still facing the sea.
The Beta LT, with fully taped seams and a waterproof membrane, was noticeably warmer in gusty, damp conditions even when I wasn’t moving. Its fabric blocks wind and holds a micro-layer of warm air next to the body; standing on cliff paths watching falcons, I felt more comfortable for longer. The trade-off is that Beta LT is less breathable than the Houdini when you’re working hard, and it’s slightly heavier—though not heavy enough to be burdensome on a day hike.
Water protection and sea spray
On Durness the difference between drizzle and true spray is important: sea-spray soaks outer layers and kills insulation. The Houdini has a Durable Water Repellent (DWR) finish that beads light drizzle, but it will wet out in sustained spray or heavy Scottish rain. Once the fabric wets, windchill rises and the Houdini offers little insulation.
The Beta LT, being a GORE-TEX waterproof shell, handled spray and sideways rain with ease. Water beaded and ran off; even after an hour of coastal gusts with spray hitting me, the inner layers stayed dry. For photographers shooting from cliff edges or for days forecasted with coastal squalls, a waterproof shell like the Beta LT is worth the extra weight.
Packability and weight
If ultra-light packability is your priority, the Houdini wins hands down. It stuffs into its chest pocket and barely changes pack weight—perfect for long solo walks or bike-to-trail days when every gram counts. The Beta LT packs down well for a hardshell but takes more room and weighs more; it’s still perfectly reasonable in a daypack and doesn’t feel like a burden.
Fit, hood and practical features
Hood design matters on cliff tops. The Houdini’s hood is minimal and snug—fine for cutting wind but not structured enough to stay over your head in a strong crosswind or to shed heavy spray. The Beta LT’s helmet-compatible hood, good storm collar and adjustable hem make it much more effective at keeping rain and wind out when you’re stopped photographing or waiting for the tide to shift.
Pockets: Houdini has simple zip pockets that double as a stuff sack—handy. Beta LT has more functional pockets (including chest pocket and roomy hand pockets) that are accessible with a harness or shoulder straps on. Zipper quality, cinches and hem adjustments on the Beta LT feel more durable for long-term coastal use.
Durability and long-term use
The Houdini is lighter and inevitably less durable in abrasive cliff conditions—brush, buckled rock, and rocky belays will wear it faster. It’s brilliant as a minimalist wind shell or emergency layer, but not the best choice as your go-to everyday coastal jacket if you’re frequently brushing against gorse or carrying a pack that rubs the shoulders.
The Beta LT is built to take more abuse. The fabric resists abrasion and the waterproof membrane keeps performing year after year. For regular, committed use around Durness’s raw coastline, the Beta LT (or a similar Arc’teryx shell) is a longer-lasting investment.
Cost vs value
Patagonia’s Houdini is considerably cheaper than a high-end Arc’teryx waterproof shell. If you only need wind protection for shoulder-season hikes and value packability above all, the Houdini is excellent value. If you spend many days exposed to salt spray, rain, and strong wind—or you need reliable protection for photography sessions and longer waits on the cliffs—the higher price of the Beta LT pays off in comfort and reduced damp-cold risk.
| Patagonia Houdini | Arc’teryx Beta LT | |
|---|---|---|
| Primary use | Wind shell, ultralight | Waterproof hardshell, all-weather |
| Weight | Very light (~100–200g) | Light but heavier (~300–400g) |
| Water protection | DWR, handles light drizzle | Waterproof (GORE-TEX), handles spray/squalls |
| Windproof | Good | Excellent |
| Packability | Excellent (stuffs into pocket) | Good (bulky compared to Houdini) |
| Durability | Moderate | High |
| Cost | Lower | Higher |
How I layered them on Durness cliffs
Layering is everything here. My go-to setup:
- Base: merino long-sleeve or synthetic baselayer for moisture control.
- Mid: lightweight fleece or synthetic insulating layer—enough to sit comfortably for photos.
- Shell: Houdini for brisk, dry days when I’ll be moving a lot; Beta LT when rain or spray is likely or when I expect long stops.
If I’m carrying camera gear and expect windy squalls, I choose the Beta LT every time. If I’m doing a fast coastal loop with minimal stopping and want to keep pack weight down, Houdini is my pick.
Practical tips for choosing your shell
- Consider typical conditions: do you face sea spray and long waits on the cliff? Pick a waterproof shell.
- Think about activity: high-exertion hikes favour breathable wind shells; low-activity photography favours waterproof shells.
- Test hood fit with your head/hat/helmet—if the hood won’t stay on in a crosswind, it’s less useful on the north coast.
- Don’t forget DWR care: re-proof lightweight shells regularly to maintain performance.
- If budget allows, balance both: a lightweight wind shell and a compact waterproof shell cover most scenarios without too much extra weight.
For Durness cliff tops, my practical rule from this week of testing is simple: choose the Houdini for speed and sun with a reliable midlayer; reach for the Beta LT when wind, spray or rain are realistic. Both have their place in my rucksack—patience and local awareness (watch the cloudbase and sea state) will tell you which one to pull out when the north wind turns up.