I’ve walked this quiet loop at sunrise more times than I can count, and each visit rewrites the script a little — softer light, different cloud drama, a seal popping up where there wasn’t one yesterday. If you come for photos, come with patience: the route rewards photographers who slow down, read the light and pick their compositions carefully. Below I’ll share the exact vantage points I use, a practical timing plan keyed to sunrise and tides, and camera settings and gear that consistently help me get clean, emotive images of Durness’s cliffs and coves.
Why this loop works for sunrise photographers
The loop starts and finishes within easy reach of village parking, keeps you mostly off busy roads, and strings together a mix of dramatic cliff edges, sheltered coves and low rock platforms perfect for long exposures. At sunrise the light comes in at a low angle from the east, backlighting spray on the cliffs and casting long shadows that emphasize texture. The landscape here is compact enough that you can shoot three distinct scenes in under two hours if you plan your stops.
Quick overview of the route
- Park at the small layby near the community shop (or the village car park if it’s summer).
- Follow the path north to the headland — this section gives you the classic cliff-line silhouette.
- Drop down to the hidden beach via the steep grassy path (watch for soft turf and sheep tracks).
- Walk the stony foreshore east toward the rock platforms and sea stacks.
- Return along the coastal footpath that trends back inland with views across the bay.
Vantage points I prioritize (and why)
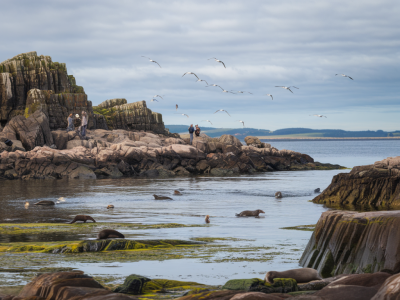
Cliff-edge headland: My first stop. From here I like wide-angle compositions that catch a sweeping bay, a jutting promontory and the sky. Early morning mist or low cloud can add mood; when it’s clear I drop to a lower angle to silhouette the cliff against the brightening sky.
Hidden beach amphitheatre: This small cove, reached by a short scramble, frames incoming waves between two grooved rock faces. I often set up mid-beach and use a 10–20s exposure with an ND filter to smooth the water and show the movement lines converging on the shore.
Rock platforms and stack: The platforms make superb foreground interest. Look for tide pools reflecting the sky and tiny seaweed details that give scale. If the tide is mid to low you can step farther out for an elevated view of the stack; high tide gives drama as waves crash around it.
Bay outlook on the return leg: A quieter location for tighter compositions — layers of cliff, grass and a narrow strand. I mount a longer lens here (70–200mm) to compress the scene and isolate light on ledges where gulls or otters might appear.
Timing: sunrise, tides and light
Timing is everything. I check three things before I leave: official sunrise time, local tide tables, and wind direction. For most shots you want to arrive at least 30–45 minutes before sunrise:
- 30–45 min before: set up at the headland for pre-dawn color and long-exposure seascapes while the sky has that deep blue hour palette.
- Sunrise: move to the hidden beach for backlit spray and golden rim-light on rock faces.
- +30 to +60 min: shift to the rock platforms where the warmer side-light sculpts textures and highlights tide pools.
| Condition | Best window | Why |
|---|---|---|
| Low tide | 1 hour around low | Exposes rock platforms, pools, and foregrounds for long-exposures |
| Mid tide | 1 hour around mid | Good wave action around stacks; safer for access |
| High tide | 1 hour around high | Great for crashing waves and dramatic spray; watch for reduced foreshore |
When the wind is from the east expect stronger surf and more spray. An easterly wind can give powerful backlit spray at sunrise; a west wind tends to flat-line the sea and is better for mirror-like reflections in pools.
Camera settings and composition tips
I switch between three basic modes depending on the composition:
- Blue hour long exposure: ISO 100, f/8–f/11, 10–30s with a 10-stop ND filter when necessary. Use mirror lock-up or electronic front-curtain shutter to avoid shake.
- Golden hour coastal frames: ISO 100–200, f/5.6–f/11, shutter speed set for subject (1/125–1/500 for birds, 1/10–1/30 for moving water without ND).
- Detail and compression shots: Telephoto at f/8–f/11, 1/250–1/500, ISO up to 400 depending on light to keep images pin-sharp.
For composition: look for strong foreground elements (seaweed, driftwood, tide pools) that lead into the midground stack and then to the sky. Use leading lines along the rock strata and consider placing the horizon on the top or bottom third — not the middle. Reflections in pools are a simple but effective symmetry trick during calm moments.
Gear I take on this loop
- Tripod with spiked feet (helps anchor on rock).
- Wide-angle lens (16–35mm) and a 70–200mm for compressed views.
- ND filters: 6–10 stop for long exposures; graduated ND if the sky is much brighter than the sea.
- Remote release or camera with interval timer.
- Waterproof camera bag and weather-sealed camera or rain cover — the spray can come up fast.
- Sturdy boots, gaiters and layered clothing — temperatures change quickly at dawn.
Safety, access and responsible photography
Cliff edges here are unstable in places. I never stand too close to eroding turf and I carry microspikes in winter when paths are icy. Tide knowledge is essential: never get cut off on a foreshore by an incoming tide. I use the local tide app and a printed timesheet as backup.
Respect wildlife — seals and nesting seabirds are sensitive at dawn. Keep a reasonable distance and use a long lens rather than approaching. Always follow leave-no-trace principles: pack out everything you bring in, avoid trampling fragile dune grasses, and stick to established paths where possible.
Post-processing workflow pointers
I aim for subtlety. My usual steps are:
- Correct exposure and white balance in Lightroom; use graduated filters to recover skies if needed.
- Local contrast and texture on cliffs to bring out detail, but avoid over-sharpening sea foam.
- Clone or heal only distracting litter or unnatural elements — keep the landscape authentic.
- For long exposures, blend a short exposure if highlights are blown on cresting waves, or use an exposure-stack to reduce noise in the sky.
If you’re visiting the area for the first time, plan a dry run the afternoon before a big sunrise shoot — walk the route, note exact distances between vantage points, and test footing. That saves time when the light is fleeting. If you want specific frame-by-frame directions for this loop — or GPS pins for the exact spots I use — send me a message through Hillside Durness Co at hillside-durness.co.uk and I’ll share a printable route map.